Introduction
Software projects are getting larger and more complicated year after year stressing the need for efficient and reliable tools and agile project management methods. Widely used and recognized tools in Open Source development, CVS and Bugzilla, have been proven to be suitable for most kind of software projects and have lately been accompanied in many projects with an emerging document and content management system, Wiki. These tools are usually used separately, rarely integrated with each other to enable easier understanding and management of the whole process flow from specifications and code to releases and maintenance. Integrated tools would also provide more effective and seamless environment for software development with improved quality and productivity.
This document provides a detailed configuration guide to integrate incrementally several Open Source development tools creating a seamless development enviroment without unnecessary complexity or overhead. Bugzilla/CVS/MediaWiki are all linked to each other and they together with mailing lists and various CVS utilities provide easily accessible way to see changes to documentation and source code, handling of bug reports, and people contributing to projects without any additional tools or preparations in matter of minutes whenever needed. All this is achieved by using three special magic identifiers to create references to other tools. The identifier BugID: creates references to Bugzilla, VCS: creates references to version control system, CVS, and Wiki: creates references to Wiki. Whenever writing a Wiki document, a bug report, or a CVS commit message, these identifiers can be used and they are then automatically turned into hyperlinks pointing to the tools referenced. This enables smooth browsing from specifications to code, from code to bug reports, and back from bug reports to code changes and documentation. Additionally, all activities in projects are archived in mailing lists, CVS utilities provide graphical statistics, and bug reports contain references to actual changes or documentation that permitted closing the report. The instructions below proceed incrementally by configuring one tool after another until the whole environment is set up. Provided screenshots illustrate results of integration. These instructions can be used of course separately to set up only parts of the presented environment or to integrate with the tools already in use. Reader is expected to have basic knowledge about the tools and their purpose.
Mailman Configuration
The following instructions to configure Mailman mailing list
manager are based on Red Hat
packaged Mailman RPMs that
have some paths different compared to official Mailman releases but
otherwise the instructions can be used with any version of Mailman. It
is of course necessary to run httpd and
sendmail (or some other MTA) at the server where Mailman archives are located.
First, Apache is
configured to redirect queries to /mailman to a list info
page. This setting is recommended for all Mailman installations and
requires only adding one directive to the file
/etc/httpd/conf.d/mailman.conf that is installed from the
Mailman RPM. Obviously, you
must change the hostname to match your local environment.
RedirectMatch ^/mailman[/]*$ http://www.dom.ain/mailman/listinfo
This setting will be effective after the service httpd has
been restarted:
/sbin/service httpd restart
Actual Mailman configuration begins by setting Mailman site password with the command:
/usr/lib/mailman/bin/mmsitepass <your-site-password>
Main configuration file for Mailman is
/etc/mailman/mm_cfg.py. There are dozens of configuration
directives that could be set but here only two mandatory settings and
few recommended ones are listed. The mandatory settings are:
DEFAULT_URL_HOST   = 'www.dom.ain'
DEFAULT_EMAIL_HOST = 'dom.ain'
The settings must, of course, be adjusted to match your local
environment. If you use localhost.localdomain as
DEFAULT_EMAIL_HOST then you should also add the following
line just after the previous directives:
VIRTUAL_HOSTS.clear()
Other recommended and/or useful settings include the following:
ALLOW_SITE_ADMIN_COOKIES = Yes  # For secure intranets only
DEFAULT_CHARSET          = 'utf-8'
DEFAULT_MAX_MESSAGE_SIZE = 4096 # kB
# These are needed if archives are accessed only by using HTTPS
DEFAULT_URL_PATTERN = 'https://%s/mailman/'
PUBLIC_ARCHIVE_URL  = 'https://%(hostname)s/pipermail/%(listname)s'
To update Mailman configuration after configuring needed directives the following command must be executed:
/usr/lib/mailman/bin/update
Next, for administration purposes the mailing list mailman
must be created:
/usr/lib/mailman/bin/newlist mailman
The command will ask for an e-mail address for person running the list.
The e-mail address must contain proper host and domain parts also for
local users so enter an e-mail address like
[email protected]. Follow the provided
instructions on how to update the file /etc/aliases to
properly process e-mails sent to the list. After updating
/etc/aliases, the alias database must be updated with the
command:
/usr/bin/newaliases
The service mailman that updates the archives when needed
can now be started:
/sbin/chkconfig mailman on
/sbin/service mailman start
Now the actual lists for Bugzilla and CVS can finally be created. Two lists will be used, one
for archiving Bugzilla activities and one for CVS activities. For Bugzilla activities, the
list shall be prj-bugs and for CVS commits prj-vcs.
To create a new mailing list open the URL http://www.dom.ain/mailman/create in a
browser and follow the instructions to create the list. Mandatory
information that must be provided when creating a list is the name of
the list, initial list owner e-mail address, and initial list password.
For other settings, default values are usually suitable. Note that after
creating the mailing lists the file /etc/aliases must
updated as instructed in the e-mails sent to the list creator and after
the update the command newaliases(1) must be run.
After both the lists have been created configuration should be changed
to allow anyone to post to the lists. Especially with the list
prj-vcs this eases maintenance, as there is no need to
duplicate changes to CVS
rights in the mailing list configuration. To allow all postings to a
list, visit list's admin page and go to Privacy Options->Sender
Filter and change settings By default, should new list
member postings be moderated? to No and Action
to take for postings from non-members for which no explicit action is
defined. to Accept.
The last step is to enable the magic identifiers in the mailing list
archives. Applying this
patch and restarting the mailman service is all what is
needed to enable them. The patch was generated against Mailman 2.1.5
but it should apply also against later versions in the 2.1.x series.
Once done, the mailing list configuration is ready.
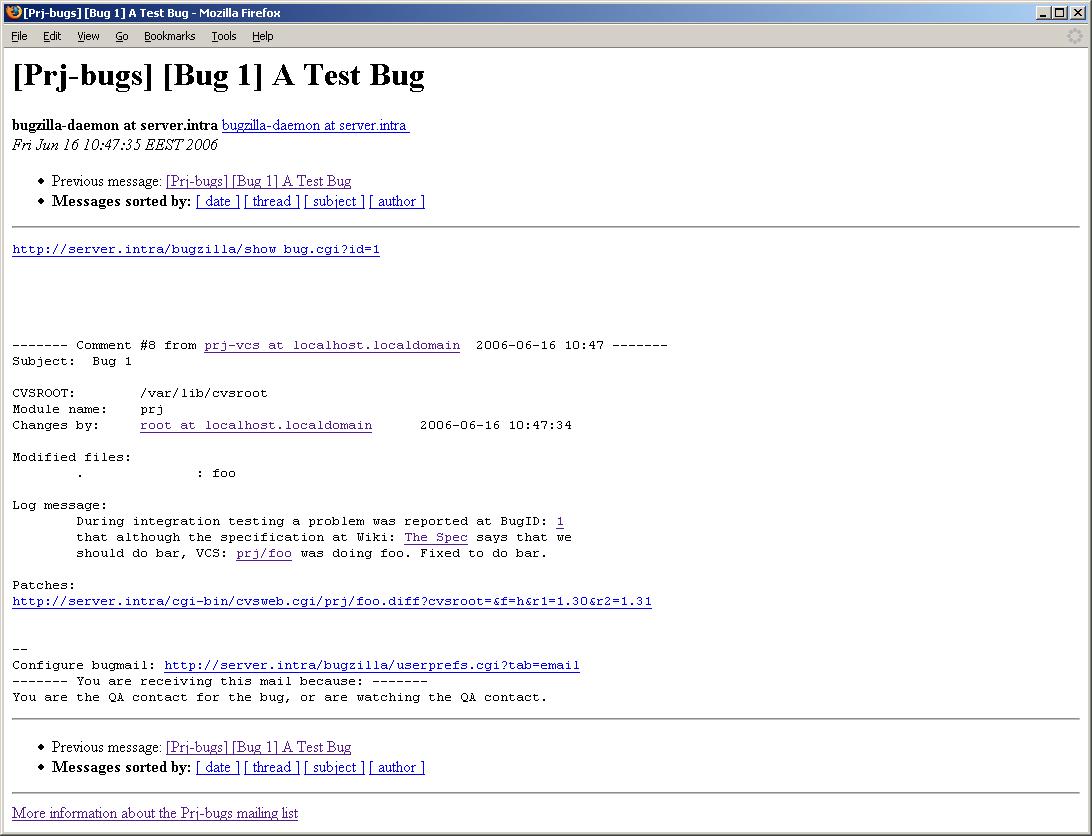
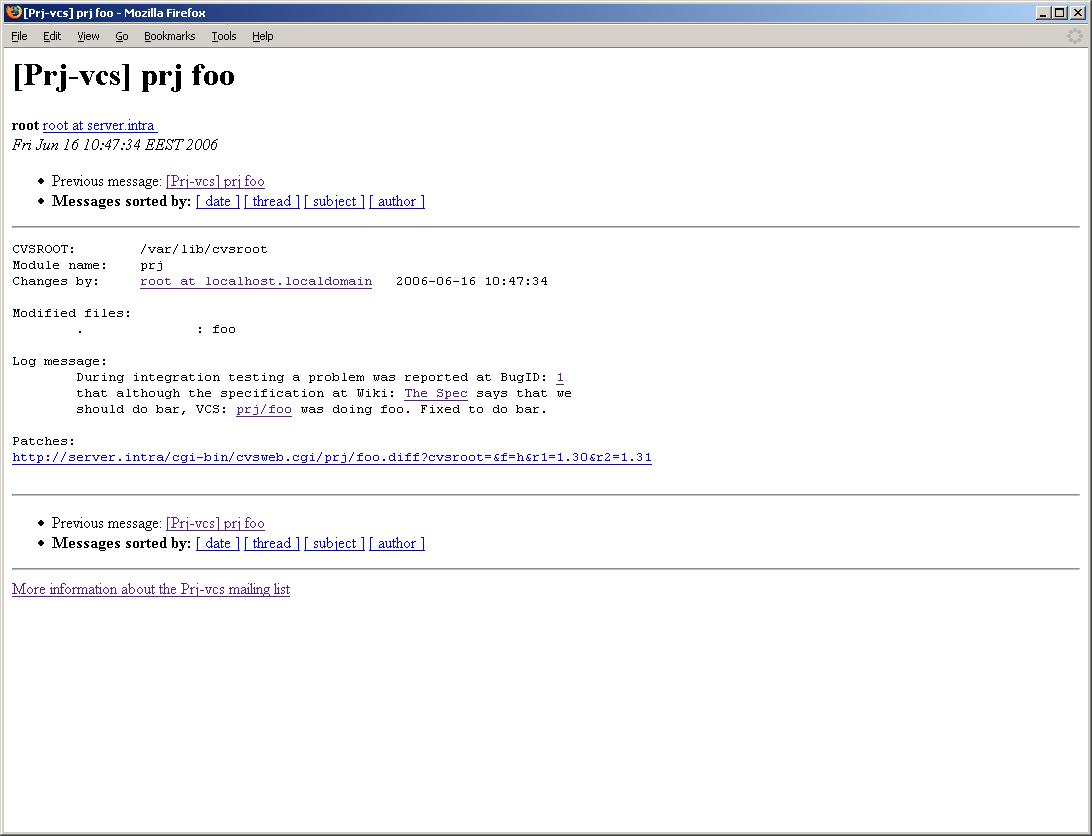
Available screenshots: commit message in the
prj-bugs list and commit message in the
prj-vcs list.
MySQL Configuration
Both Bugzilla and MediaWiki use MySQL database to store data so before
installing Bugzilla or MediaWiki, MySQL must be installed and
configured. These instructions provide only quick steps to get MySQL 4
or later ready for Bugzilla and MediaWiki, for any performance
optimizations or other advanced adjustments you should refer to MySQL
documentation. MySQL should be installed from a package provided
with your distribution. Note that before configuring MySQL the MySQL
database server (mysqld) must be running.
The very first configuration step after MySQL installation is to set
MySQL root user password. This can be done with the
following command. Note that the command will fail if the password is
already set so this command can be executed more than once if in doubt.
mysqladmin -uroot password <root-password>
Actually, this is all what is needed for MediaWiki as its installer will
set up the rest. But for Bugzilla the user bugs must also
be added:
mysql -uroot -p<root-password> mysql
GRANT SELECT, INSERT, UPDATE, DELETE, INDEX, ALTER,
  CREATE, LOCK TABLES, CREATE TEMPORARY TABLES, DROP,
  REFERENCES ON bugs.* TO bugs@localhost
  IDENTIFIED BY '<bugs-password>';
FLUSH PRIVILEGES;
Those are the only mandatory configurations needed for Bugzilla and
MediaWiki but you probably also want to configure mysqld to
start during system bootup. Other MySQL configuration options can be
studied from the MySQL documentation. For reference, however, few of the
most useful options are also provided here for download. To apply these settings add them to
the file /etc/mysql.cnf into the [mysqld]
section.
Bugzilla Configuration
Bugzilla
configuration usually requires a bit of work but the actual procedure is
rather simple. Before installing Bugzilla, make sure that you have
installed Perl and MySQL is configured. If Perl is not installed, use
your distribution's packages to install it. Then, download latest stable Bugzilla
release, unpack the downloaded archive, and move the extracted
directory as /var/www/html/bugzilla. To start Bugzilla
configuration, enter the Bugzilla directory, fix owner of the files and
directories, and run the checksetup.pl script with the
parameter --check-modules:
cd /var/www/html/bugzilla
chown -R root:root . *
./checksetup.pl --check-modules
The script will most likely complain about missing Perl modules. You
must install all the required Perl modules. Whether you should
also install all or some of the optional modules mentioned depends on
many things. If you eat Perl for breakfast and already know how to
install Perl modules then it is surely no problem to install all the
optional modules, too. But if you just want to get Bugzilla up and
running and perhaps later investigate the features provided by the
optional modules then just follow the instructions provided by the
checksetup.pl script to install the required modules. Note
that some of the modules may be found from your distribution's package
collections. If the module installation gets complicated, you may find
some help from the Bugzilla documentation. When
checksetup.pl is finally happy, rerun the script without
any parameters:
./checksetup.pl
This time, checksetup.pl will instruct you to edit the file
localconfig. Most likely the only setting you want to
change is $db_pass. Set it to match the bugs
user password you used earlier during MySQL
configuration. When done, rerun the script
checksetup.pl again without any parameters:
./checksetup.pl
The script should proceed until it asks for an administrator. Please
enter a valid e-mail address, administrator's real name, and a proper
password. After checksetup.pl finishes, one final step is
remaining; Apache must be configured to allow CGI scripts to be executed in the Bugzilla
installation directory. This can be done by adding the following lines
to Apache configuration file, usually
/etc/httpd/conf/httpd.conf:
<Directory /var/www/html/bugzilla>
  AddHandler cgi-script .cgi
  Options +Indexes +ExecCGI
  DirectoryIndex index.cgi
  AllowOverride Limit
</Directory>
Setting will be effective after the service httpd has been
restarted:
/sbin/service httpd restart
Bugzilla is now installed and mostly configured and can be used with a
browser at the URL
http://www.dom.ain/bugzilla/. Log in as administrator and
go to Parameters page. There are several configuration
options that could be tweaked. At least the following two options should
be changed: maintainer should contain valid e-mail address
of the Bugzilla installation maintainer and urlbase should
contain the URL of the
Bugzilla installation. There are also two seducing CVS related options:
cvsroot and cvsroot_get. Unfortunately,
functionality enabled by those options is of very little or no use at
all; they only provide more contexts to patches attached to bug reports
if the code is in the CVS repository. Certainly you may experiment with those
options but it is recommended to ignore them. More information about all
the options can be found from the Bugzilla documentation.
After saving parameter changes, you must add two new users for
integration purposes. As administrator go to administration page
Users->add a new user and then create users
[email protected] and
[email protected]. You may want to use
descriptive real names like Bugmail and VCS
Commits but more importantly disable the accounts by stating
their purpose in the Disable field. The accounts will be
used to send bug activity e-mails to the prj-bugs mailing
list and to append CVS
commits log messages to bug reports.
To enable automatic bug activity e-mails Default CC List
must be set for each component for which the feature is wanted.
Components can be found under the menu Products->Edit
Product. Same account can be reused for as many components as
wanted and typically all components of a product have the same CC list when used for activity e-mail
generation. Example product TestProduct and its component
TestComponent that are automatically created during
Bugzilla installation can be used to see how the automated e-mailing
works by setting Default CC List account of the
TestComponent as
[email protected]. Whenever a bug is created
against TestComponent or status of a
TestComponent bug changes an e-mail is sent to the
prj-bugs mailing list and archived.
The last required step is to enable the magic identifiers in Bugzilla. Applying this patch is all what is needed to enable them. The patch was generated against Bugzilla 3.0.2 but it should apply also against later Bugzilla 3.x releases.
At this stage you might want to test your Bugzilla installation a bit by
creating a test bug or two against the example product
TestProduct and see how linking with the magic identifiers
and automated e-mails work. You may also want to adjust some other
options, such as the e-mail templates and time tracking group, in the
Parameters page to better suit your needs. After Bugzilla
seems to be your liking, you can proceed to the next
section.
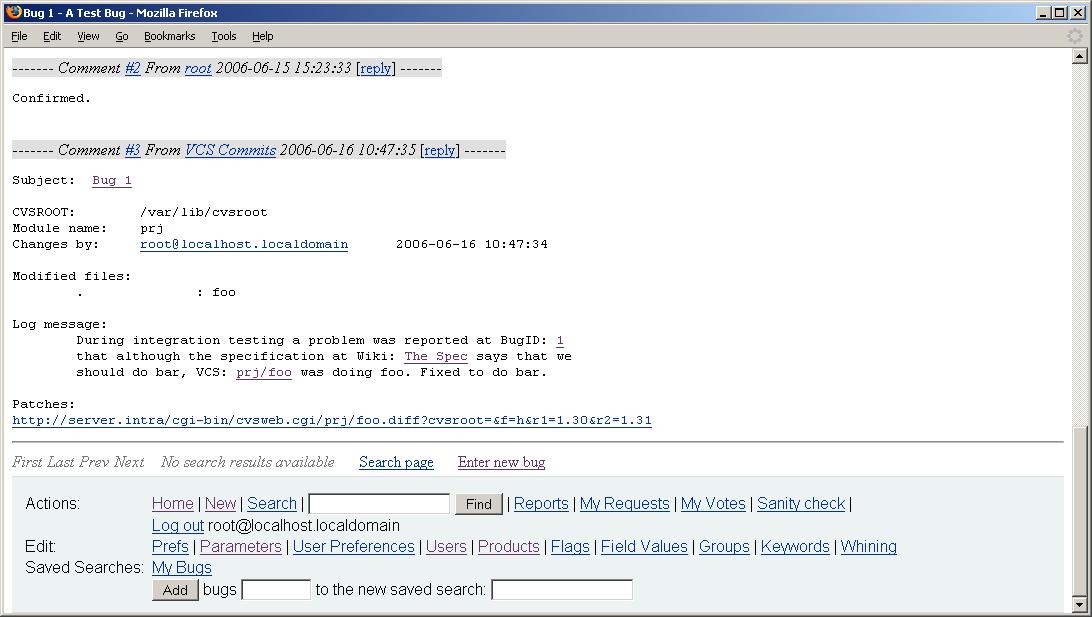
Available screenshots: commit message in Bugzilla.
CVS Configuration
Basic set up of a CVS repository is rather
straightforward task. The most important configuration setting with
CVS is the environment
variable CVSROOT that defines the used CVS repository. The
configuration presented here uses the directory
/var/lib/cvsroot as the repository and expects that all
CVS users belong to the
group users. More information about other settings can be
found from the CVS manual.
To initialize a new repository, create necessary files, and set file permissions correctly the following commands must be executed:
export CVSROOT=/var/lib/cvsroot
mkdir -p /var/lib
cvs init
chgrp users $CVSROOT
chmod 2775 $CVSROOT
touch $CVSROOT/CVSROOT/history
chgrp users $CVSROOT/CVSROOT/history
chmod 0664 $CVSROOT/CVSROOT/history
touch $CVSROOT/CVSROOT/val-tags
chgrp users $CVSROOT/CVSROOT/val-tags
chmod 0664 $CVSROOT/CVSROOT/val-tags
mkdir -p /var/lock/cvs
chgrp users /var/lock/cvs
chmod 2775 /var/lock/cvs
cvs co CVSROOT
sed -ie 's,#LockDir=.*$,LockDir=/var/lock/cvs,g' CVSROOT/config
cvs ci -m "Use a lock dir." CVSROOT/config
echo y | cvs release -d CVSROOT
These commands set CVSROOT, create and initialize the
repository and a lock directory, create files for CVS operations, and make sure
the files have sane permissions. More information about these files can
be found from CVS
documentation but during this integration deeper knowledge about
these files is not essential.
To add a test module prj with some dummy content the
following commands should be executed:
mkdir -p prj/test
cd prj
echo foo > foo
echo bar > test/bar
cvs import -m "Imported sources." prj prj-orig start
cd ..
rm -rf prj
Now, to start the actual integration work, CVSweb is
configured and patched so that the CVS repository can be accessed with a browser and the
magic identifiers are shown as links. Either install CVSweb using the
official sources or use a CVSweb package available for your
distribution. Then, apply two minor patches to the script
cvsweb.cgi. These patches were generated against version
3.0.6 of the cvsweb.cgi script but they should apply also to other
CVSweb versions. The first patch applied is to prevent error messages with new
files added to the repository and the second is to enable using VCS: and
Wiki: magic identifiers. In addition, some minor changes to the
cvsweb.conf configuration file must be done so that CVSweb
properly uses the repository created earlier and the magic identifiers
are enabled. The configuration file patch was generated against the original
3.0.6 configuration file but it should apply also to other versions.
There also some other changes that will be explained
a bit later. For convenience, both the patched files are also
available: cvsweb.cgi and cvsweb.conf.
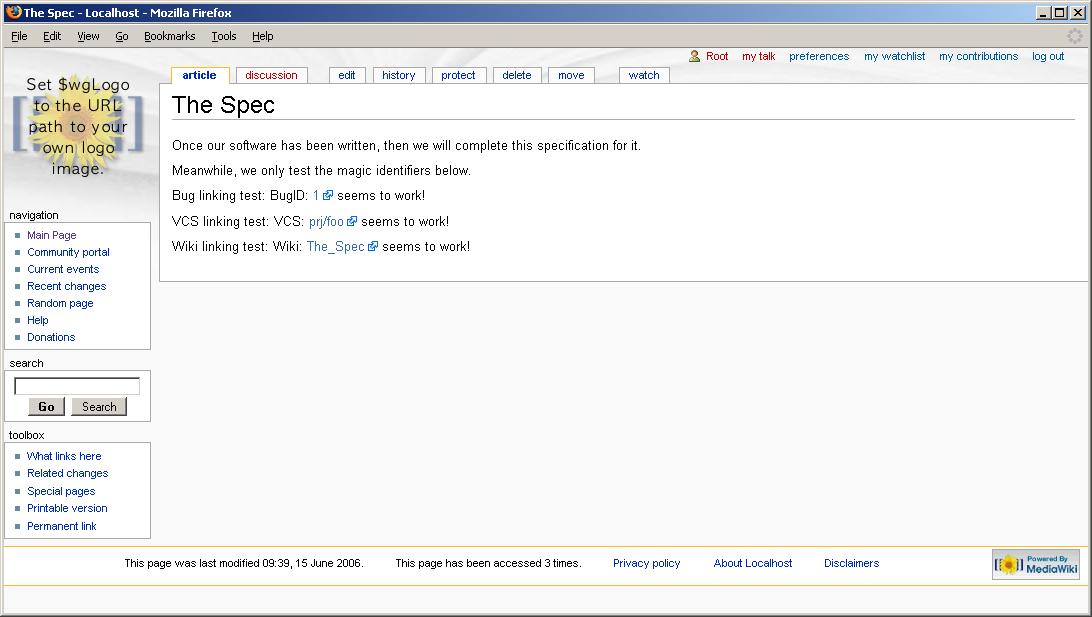
Before proceeding any further, please make sure that at this stage your CVS repository is properly set up, checkouts and checkins can be done, and that the repository can be accessed with a browser via CVSweb. You should also do some test commits using the magic identifiers in the log message to see that CVSweb produces correct links for them. An example log entry could be something like:
During integration testing a problem was reported at BugID: 1
that although the specification at Wiki: The_Spec says that we
should do bar, VCS: prj/foo was doing foo. Fixed to do bar.
If both the CVS
repository and the CVSweb interface are working properly then it is time
to begin perhaps the most difficult part of the integration. The CVS repository will be
configured to send commit e-mails to the prj-vcs mailing
list and to integrate with Bugzilla. All this is done by modifying the
administrative files under the directory $CVSROOT/CVSROOT
and using some integration scripts. Since there are many
interdependencies between the files it is probably best to do all
required changes at a go, then test the changes, and fix any problems
that might arise.
To begin, checkout the directory CVSROOT and add or replace
the following files: checkoutlist, commit_prep, commitinfo, log_accum_bugzillafied, loginfo, rcsinfo, rcstemplate. It is recommended to use
also these two optional files: cvswrappers, users. Note that the following files
must be adjusted to match your local environment
before checking them in: checkoutlist,
commitinfo, log_accum_bugzillafied,
loginfo, and, optionally, rcstemplate and
users. The purpose of each file is briefly described in
comments in the beginning of a file. Below are some additional notes
that should help to understand the way the integration is done. Note
that before checking in the files please read this section entirely and
also make sure that the scripts commit_prep and
log_accum_bugzillafied are executable:
chmod a+rx commit_prep log_accum_bugzillafied
checkoutlist simply lists additional files that should be
treated as CVS
administrative files in addition to the standard administrative files.
rcsinfo and rcstemplate are used to add a help
text that is shown when writing a commit message.
cvswrappers simply lists file types that should be handled
as binary files. users is used when automatically
generating changelogs as explained in the next
section. It does not harm to add it even without real content.
The following files, originally used in projects at sourceware.org, are in the heart of the integration and may require a bit more attention to understand them completely. However, deeper knowledge is not necessarily required since all the files contain a short configuration section that needs to be adjusted only to match your local settings; the actual code should require no changes at all.
commitinfo defines a command to be executed before commits.
commit_prep is defined and it just records the last
directory with commits for use by log_accum_bugzillafied.
loginfo defines a command to be executed after the commits.
The script log_accum_bugzillafied is defined and it sends
commit e-mails to specified addresses. Note that the script
log_accum_bugzillafied itself does not yet add data to
Bugzilla database, it will be done by the script processing the commit
e-mail sent to Bugzilla. Of these scripts,
log_accum_bugzillafied and loginfo need most
adjusting as they contain e-mail addresses, URLs, and other settings that are always
project specific. Nevertheless, the required changes should be rather
obvious after some inspection.
Since the script log_accum_bugzillafied sends the commit
messages as e-mails, they must be received and processed properly. The
processing is done by the script email_in.pl that is part
of the Bugzilla installation. The script must be slightly patched to enable it
to find all required Perl modules. The following line must be added to
the file /etc/aliases to automatically invoke the script
when sendmail receives commit e-mails. Note that the
recipient must match to the one defined in the script
log_accum_bugzillafied.
bugzilla:"|/var/www/html/bugzilla/email_in.pl"
And, once again, the command newaliases(1) must be run after
the alias database has been updated. After the update,
sendmail executes the script for all e-mails sent to the
address bugzilla. However, by default sendmail
is not allowed to run random commands while processing e-mails so the
script must be listed as an allowed command. Also the permissions in the
Bugzilla installation must be changed so that the user mail
under which sendmail is running is allowed to read and
execute all the needed scripts. The following commands allow
sendmail to invoke the script email_in.pl and
change permissions so that the user mail is actually able
to run it.
cd /etc/smrsh
ln -s /var/www/html/bugzilla/email_in.pl .
cd /var/www/html/bugzilla
chmod g+w data/mimedump-tmp
chown -R apache:mail . *
It must be noted that running again the script
checksetup.pl or editing Bugzilla parameters will change
the file permissions so that they must be adjusted again. However, as
these are rather rare events it does not cause too much maintenance
burden but this is well worth keeping in mind in case of any integration
issues.
After all these changes, you can finally commit the modifications in
CVSROOT directory. Before actually testing the integration,
please make sure that all Perl modules required by
email_in.pl have been installed. This can be verified by
running the script from the command line. If any error messages are
printed, some modules, such as MIME-tools, are probably missing. If no
errors are printed, the Bugzilla/CVS integration is complete! You may now experiment with
commits containing the magic identifiers and see how the commit messages
are appended to bug reports alongside with hyperlinks to actual changes
in CVS. If everything
seems to be working you are ready to proceed to the
next section. But be assured, the rest will be a pleasure cruise
compared to the struggle you have been through so far.
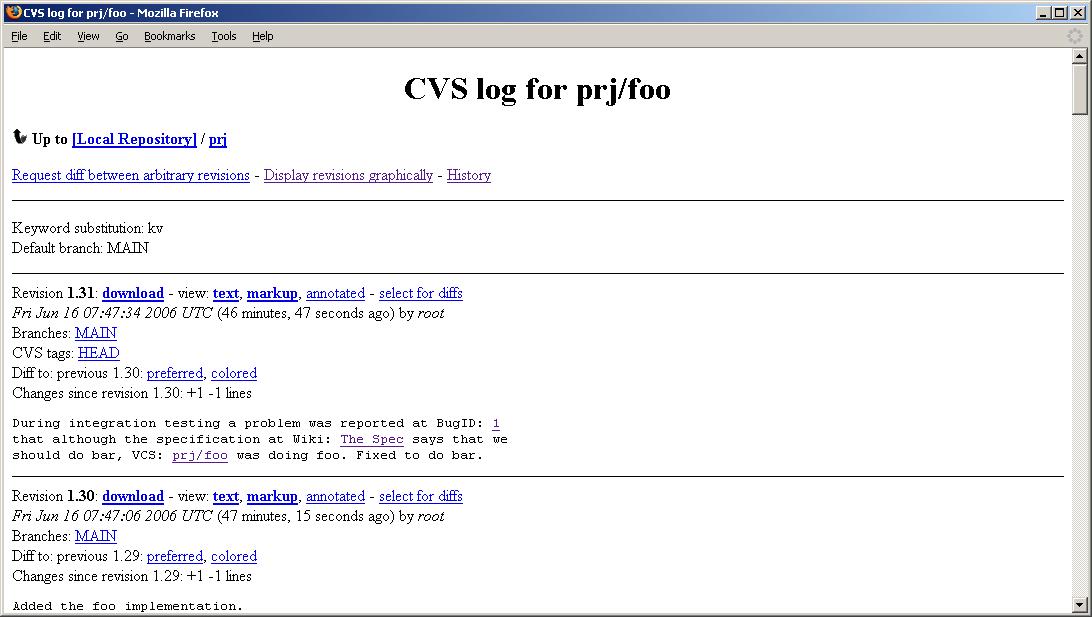
Available screenshots: commit message in repository web interface.
CVS Utilities Configuration
This section provides quick instructions on how to use some rather
useful utilities to generate statistics from your CVS repository. Although they
are not absolutely required from the integration point of view, they all
fall into the low-hanging fruit
category and are thus worth
configuring.
CvsGraph is a
utility to make graphical representations of CVS repository. It is integrated with CVSweb and
it very likely can be found from your distribution's package collection.
Compiling it from source should also be trivial, after compilation just
install the cvsgraph binary in a directory contained in
PATH. Configuration is simple and can be done by copying this file as
/etc/cvsgraph.conf. See CvsGraph pages for
more information about CvsGraph and example graphics.
CVSHistory is a utility
written in Python
that is used to track development activity on CVS using software projects. It is integrated
with CVSweb and its installation is simply done by copying the script
cvshistory.cgi from the CVSHistory package to your web
server's CGI directory,
usually /var/www/cgi-bin. Then set the
CONFIGFILE location in the script as
/etc/cvshistory.conf and copy this configuration file as
/etc/cvshistory.conf. That is all needed for installation,
a History link is now present in the CVSweb interface that
allows easy activity tracking. See CVSHistory homepage for more
information about CVSHistory.
cvs2cl and
cl2html are
Perl scripts used to
generate formatted changelogs based on CVS activities. Installation is simply done by placing
the scripts in a directory contained in PATH, e.g.,
/usr/local/bin. There are several command line parameters
that could be used but for convenience a
shell script is provided that creates GNU/HTML/XML formatted changelogs from the CVS repository and also a nice
web page to access them. Please refer to the documentation of the
scripts for more information about their usage. Note that the shell
script requires the file $CVSROOT/CVSROOT/users to be
created and if it contains valid mappings
for names those are used when generating the changelogs. As can be seen
from the script the statictics web page created by default is
/prj-cvs-stats/index.html.
StatCVS is
a tool written in Java that is used
to create exhaustive amount of statistics from projects in a CVS repository. Installation
is simply done by placing the JAR file
from the StatCVS package to a proper directory, e.g.,
/usr/local/share and running it with the help of
java(1) command. There are several command line parameters
that could be used but for convenience the previously provided shell script also contains needed
commands to create StatCVS statistics that also contain links to the
CVSweb interface. Please refer to StatCVS documentation
for more information about its usage and example statistics.
Other related CVS utilities that might be mentioned here are LXR, a general purpose source code indexer and cross-referencer, and Bonsai, a tool that lets one to perform queries on the contents of a CVS archive.
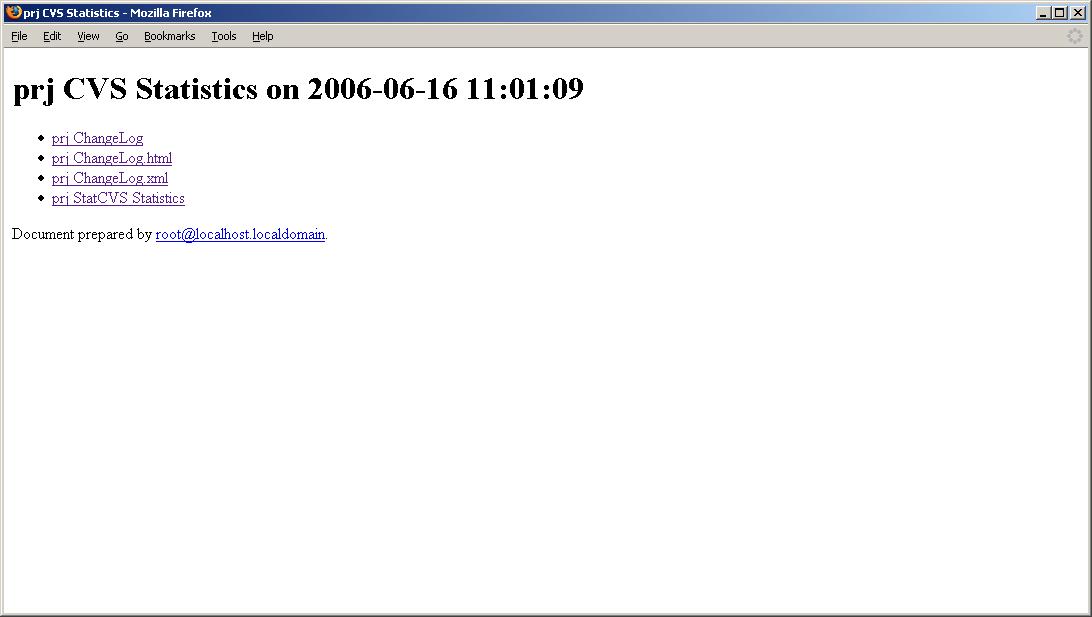
Available screenshots: links to statistics generated from the repository.
MediaWiki Configuration
MediaWiki is the
easiest piece in this puzzle so installing it will take only a while.
Before installation, make sure that you have MySQL
configured and PHP
and PHP's MySQL module
installed. They are usually included in distributions' package
collections and require no or very little configuration. Once PHP is enabled, get latest stable MediaWiki
release, unpack the downloaded archive, and move the extracted
directory as /var/www/html/wiki. You must then prepare
directory permissions for configuration with the commands:
cd /var/www/html/wiki
chown -R root:root . *
chmod 0777 config
MediaWiki configuration is then done with a browser simply by opening
the URL
http://www.dom.ain/wiki/ and answering to configuration
queries. Sufficient help for most queries is available at the
configuration page so most of the items are not covered here.
Shared memory caching would provide performance speedup but in this basic configuration, no caching is available. For all e-mail related queries you should answer depending on your own needs. Since MediaWiki automatically maintains history of recent changes and also provides them as an RSS feed so e-mailing them to a mailing list would not be very useful. Finally, in the Database config section the provided default values are suitable. For the field DB password use a proper password that is different from the MySQL root password that was set during MySQL installation. The previously set MySQL root password must then be entered into the field Superuser password. Note that you must also set the option Use superuser accounts. For Database charset it is recommended to select Backward-compatible UTF-8.
After hitting the Install! wait a minute until the next page is loaded. Check that it says Installation successful! and to finish the configuration enter the following commands:
cd /var/www/html/wiki
mv config/LocalSettings.php .
chmod 0700 config
MediaWiki is now installed and configured. To allow usage of the magic identifiers also in Wiki you need only to apply this patch. The patch was generated againt MediaWiki version 1.11.0 but it should apply also against later versions in the 1.11.x series. After applying the patch to the installed MediaWiki the magic identifiers turn into hyperlinks.
Now, after all your hard work, the integration should be finally completed, congratulations! Bugzilla/CVS/MediaWiki are all linked to each other and they together with the mailing lists and various CVS utilities provide easily accessible way to see how projects have evolved and improved. Changes to documentation and source code, handling of change requests and people involved in the project can be found out without any additional tools or preparations in matter of minutes whenever needed.
Available screenshots: magic identifiers in a Wiki page.
Conclusion
This document provided a detailed guide to integrate Bugzilla, CVS, MediaWiki, several CVS utilities, and mailing lists together. After integration, these standard tools provide an effective and seamless software configuration management (SCM) environment for professional software development allowing developers and managers to keep on track of projects and quality issues. Environment where everything from specifications and code to bug reports and code modifications are all integrated and easily accessible improves tremendously both quality and productivity of a project. Environment could be further enhanced with other tools such as a source tree monitoring system, a test case management system, a code review system, an integrated IDE, and other similar features. In a corporate environment, access restrictions and more sophisticated user management methods might also be needed. These kinds of configurations are, however, outside of scope of this document.
All the configuration files mentioned are browsable and available for download.
Comments and feedback can be sent to oss(at)segetech.com. We would kindly like to note that we cannot promise a personal reply to all e-mails received, especially to those asking for help in some unrelated configuration problems. Inquiries about possible cooperation should be done via addresses listed at our Contact page.
This document was last updated on 2007-11-13.